Monday, June 15, 2009
Windows 7 Preview
Windows 7 (formerly codenamed Blackcomb and Vienna) is an upcoming version of Microsoft Windows, a series of operating systems produced by Microsoft for use on personal computers, including home and business desktops, laptops, tablet PCs, netbooks and media center PCs. Microsoft has stated that it plans to release Windows 7 to manufacturing in July 2009, with general retail availability set for October 22, 2009, less than three years after the release of its predecessor, Windows Vista. Windows 7's server counterpart, Windows Server 2008 R2, is slated for release at the same time.
Unlike its predecessor, which introduced a large number of new features, Windows 7 is intended to be a more focused, incremental upgrade to the Windows line, with the goal of being fully compatible with applications and hardware with which Windows Vista is already compatible. Presentations given by the company in 2008 have focused on multi-touch support, a redesigned Windows Shell with a new taskbar, a home networking system called HomeGroup, and performance improvements. Some applications that have been included with prior releases of Microsoft Windows, including Windows Calendar, Windows Mail, Windows Movie Maker, Windows Photo Gallery, will not be included in Windows 7; some will instead be offered separately as part of the freeware Windows Live Essentials suite.
Read More..
Microsoft Windows 7 Official video
Microsoft has been investing in many forms of natural input to enable users to interact with the PC and their devices using touch.
Read More..
Tuesday, May 5, 2009
Set Attribute Harddisk with Disk Management
With the computer management, you can manage many things. In fact some of the features already present in each of your hard disk properties, it is only through the computer management will have more things that can be done.
1. Format
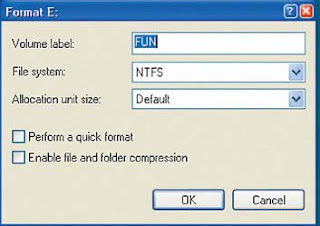
when formatting a hard disk or partition, you can simply right click on the partition and select the desired format. Then specify the type of format the list available in the File system box after that press the OK button, then the format will be run. You can also give a name or label on the new section that will be formatted via the Volume label box that is at the top. How the format you want, just select the option on the OK button.
2. Changing Drive Letter
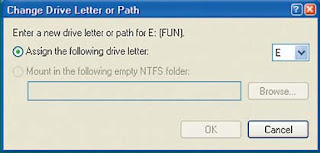
Right-click on the drive letter you want to change and select Change drive letter and path. Then specify the drive letter that will be changed, then press the Change. Then in the following box Assigned drive letter select the desired letter. After that, press the OK button. After you press the OK button, the computer will inform you that the changes can be done to create an application that exists on the drive can not be run again. If you still want to continue, press Yes. Similarly, the second warning. Then restart the computer to activate it. For naming the drive, all can be given a name including the drive C:.
3. Renaming Drive
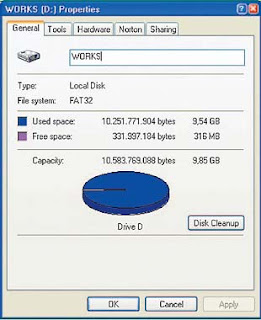
You can also change the naming in line with the drive you want. I select a drive that will be renamed and click on the right and select Properties. At the top of the box enter the desired name and press the OK button or Apply. We suggest naming the label is adjusted to the contents of the hard disk or partition concerned, so that later you will not be difficult to read the contents. Moreover, if the capacity is very large.
4. Defrag
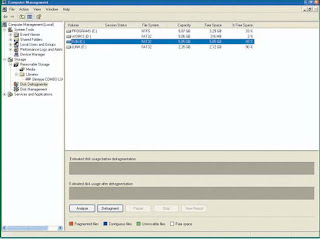
Through computer management page, you can also defrag your hard drive-way open Disk Defragmenter page. Select the drive you want to defrag, and press the button Analize first in the bottom. After that, the Defragment button click to start a defrag-it. Defragment aims to sort out the allocation, or data file on disk. Data that is damaged will be removed so that in addition to alleviate the burden of how hard this can also improve the performance of your hard disk.
5. Error Checking
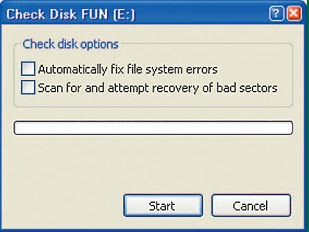
There is damage in your hard drive? Find using the error checking in addition you can find out if there is interference on the hard disk or not. If so, you can directly improve it. How to do error checking is on the right by clicking on the drive and select the desired properties. Tool and not the page, and in the Error Checking click Check Now. After that you will be asked, what if any error will be corrected immediately or not, if I give a check () on boksnya. After that start checking your error by pressing the OK button.
6. Back-up
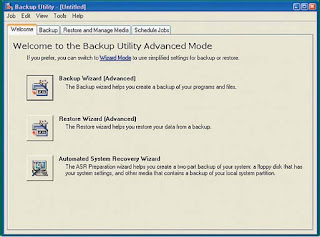
The process of back-up can also be accessed through the computer management or drive properties. I right click on the drive and select properties. Go to the Tools page and press the Back up now. The process of back-up will be like running in general. This will be very easy for you to do the back-up. In addition, you also always reminded every time you check the hard drive capacity. If you are confused how to back-up, try running the application in the wizard.
7. AutoPlay and Burning
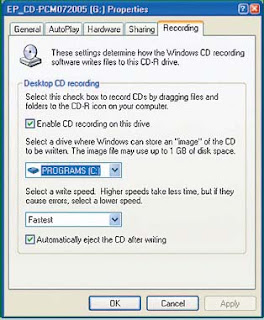
If you have a CD-ROM or CD-RW ROM, then you can set two things. For only the CD-ROM course, you can set the desired process autoplay. While recording in the page, you can set the cache memory where the burning will be placed. And with the speed of the burning process will be done. Our suggestion, give it a value equal to the number of cache CD or DVD you burning normal. For the less cache can make burning process fails or is very slow. Read More..
Tricks and Tools to Make Windows XP You Employment
Do you work with multiple Windows XP computers from the same screen? What you must do administrative work on another computer? And IE add-on what you have and what their purpose?
That is part of the situation that you may ever face. Other examples, depending on how your system appears to be severe, you may need to use that is not normal. Start of run System Restore from the command prompt to clean up trash with the Duplicate Finder. Here are tricks and tools of Windows XP for your job easier.
Running System Restore from the Command Prompt
Using System Restore to fix the Windows XP system behavior that is a strange thing that is not normal, but depending on how your system appears to be severe, you may need to use that is not normal.
If your Windows XP system come into strange, the usual repair is to use System Restore to remove the system changes made since the last time you create a Restore Point. However, what if the problem is so severe, so you can not run Windows XP normally or even run the system in Safe Mode?
Fortunately, you can run System Restore from the command prompt. Restart your computer and press the [F8] on the initial startup time (shortly after checking the computer and before Windows XP logo appears). At the time you see the Windows Advanced Options Menu, select Safe Mode With A Command Prompt.
Select the Windows XP operating system. Go to the computer using the administrator account or an account with administrator access rights. Type the following command at the command prompt: C: \ windows \ system32 \ restore \ rstrui.exe. At the time you see the System Restore window, grafi knya may look strange, but you still follow the usual instructions on the screen to restore your computer to the previous situation.
Speed Windows XP Search Companion
There are a lot of whispering about the search feature of Windows Vista is faster, but what you can do to speed Windows XP Search Companion? Reasons why Windows Vista Search tool so quickly it is not all hard to find, but only find it in the Documents folder. So, next time you run the Windows XP Search Companion, click All Files and Folders and select My Document from the Look in list. Thus the Search Companion does not search the entire hard drive.
If you want to search for documents stored in the root, you can speed up the process with the system folder from the search. Click All Files and Folders, open the More Advanced Options, and remove the check () in the Search System Folders. If the Search Hidden Files and Folders is checked (), is also removed.
If you have a lot of fi le zipped (or compressed folder, Windows XP, so called) on the hard disk, Search Companion will search them all, so it will be slow. So that Search Companion does not find the compressed folder, move all folders to the root and then Configuration gurasi Search Companion to find only in the My Documents folder or disable Windows XP support for the compressed folder.
To disable support, open the Run dialog box, type the command regsvr32 / u dr.dll zip on the Open box, and then click OK. You must restart the system so that changes applied. (To enable support for Windows XP back to a compressed folder, use perinah regsvr32 zip dr.dll).
What if the Search Companion in-disable? If you disable Windows XP Search Companion to use interface Search and Windows 2000, you must do the following: to find the My Documents, select My Documents from the Look in list;
To remove the system folder from the search, click Search Options, check () Advanced Options, and then removed the check mark () in the Search system folders. (If the Search hidden folders and fi led is checked (), removed as well); to prevent the compressed search folder, you can use the same way in the Search Companion.
Monitoring Multiple Computers with Windows XP BGInfo
Working with multiple Windows XP computers from the same screen? Do you often work with multiple computers using the switch Keyboard Video Mouse (KVM)? If so, you surely know that sometimes confused about where the computer at this time appear on the screen.
Of course, you can find out himself, but it requires several steps and can disrupt especially if you are doing important work or take a long time.
Fortunately, there is a solution that is called BGInfo program, which is the abbreviation of Background Information. Mengakusisi Sysinternal at the time, Microsoft also mengakusisi Utilities all small and they are included in the Microsoft PowerToys, and BGInfo is one of them.
Once installed, BGInfo displays information about the computer. For example, you can configure to display BGInfo computer name, IP address, service pack version, boot time, the amount of empty space, and more. You can even choose the font and background color.
You can download BGInfo Microsoft's TechNet site. There you will also find detailed instructions for installing and using BGInfo.
Launch Windows Explorer with Administrator Access Rights
At the time you are using the computer and the user should do the job by using the administrative user account, you can use the Run as command to run the Utilities with administrator access rights.
However, if you use the Run as Windows Explorer to run with administrator access rights, there is nothing happens. This is because Explorer.exe is running and only one instance of Explorer can be run at one time.
More spesifi k, at the time you run Explorer.exe, the first thing done is to check whether he is running. In the second instance Explorer.exe see that Explorer.exe first instance is already running, the second instance of Explorer.exe immediately close without notice.
If using Internet Explorer 6 or 7, you can run Windows Explorer with administrator access rights. Internet Explorer 6 can use the Run as so you can go into Windows Explorer. Right-click the Internet Explorer icon on the Quick Launch toolbar and then click Run as (please note that you can not access the Run as Internet Explorer from the icon located on the desktop or Start menu).
Enter your username and password that the account has administrator access rights, and then click OK. After Internet Explorer appears, type C: \ Addressbar on. Windows Explorer will appear in the same window, and executed with the permissions admistrator.
If you use Internet Explorer 7, the steps for Internet Explorer 6 can not be used because with the new security features in version 7, Internet Explorer is no longer integrated with Windows Explorer. You should use the standard method for running Windows Explorer with administrator access rights.
Go to the computer with the Administrator account. Open the Control Panel and run the Folder Options. In the Folder Options dialog box appears, select the View tab. Scroll through the list of Advanced Settings and check () Launch folder windows in a separate process, click OK, and then log off.
At the next time you work in the computer and the user should do the job by using the administrative user account, you can use Run as to run Windows Explorer with administrator access rights.
RoboCopy GUI Version
On Windows Server 2003 Resource Kit Tool called RoboCopy there are tools that can be used on your Windows XP system. RoboCopy copy of the tool is very powerful, allowing you to perform the copy operation is more complex than the standard tools of Windows XP copy. For example, with RoboCopy image you can create a folder tree structure on the same computer or network drive.
The only shortfall is RoboCopy you must run it from the command line. This means to use RoboCopy you must remember and type a lot of switch and parameters that can really take advantage of all feature.
Fortunately, a system engineer group called Microsoft MSN Search Derk Benisch, create add-in called RoboCopy GUI. Its user interface which consists of six gurasi Configuration tab and make use of RoboCopy very easy.
Not only its interface, which provides options through gurasi Configuration check box, radio buttons, text boxes, and the Browse dialog box, RoboCopy GUI can also save your settings so that the re-use of this tool
much easier. In addition, the GUI has RoboCopy fi le with the help and reference guide to help you use the ability RoboCopy all.
You can download the GUI RoboCopy from http://download.microsoft.com/download/f/d/0/fd05def7-68a1-4f71-8546-25c359cc0842/UtilitySpotlight2006_11.exe. Please note that you first install the Microsoft. NET Framework version 2 before installing the RoboCopy GUI.
Stick to the list of Program Start Menu
You certainly are not foreign to the panel left the Start menu, but you know why the program list is divided into two? The panel left the Start menu consists of a list of programs that Windows XP, it will be useful for you (the ditempel above the barrier) and the list of most frequently used (that is displayed below the line).
By default, Windows XP paste the link to the Internet browser application and e-mail to your list of programs on the six lines and paste the program shortcut to the list of programs under the line. To maximally exploit the Start menu as the launch of all the most frequently used, you can configure the entire left panel as a list programs are the most commonly used.
Right-click Start button and select Properties to display the dialog box Taskbar and Start Menu Properties. Click the Customize button side by side with the Start menu radio button to display the Customize Start Menu dialog.
Program on the panel, set the Number of programs on the Start menu to zero. Click the Clear List button. Show on the panel on the Start menu, you can remove the check mark () on the Internet as the default icon Internet Explorer is displayed in the Quick Launch menu, and can also remove the check mark () in E-mail, depending on how you run the e-mail application.
Click OK to close the Customize Start Menu dialog and click OK again to close the dialog box Taskbar and Start Menu Properties. Click the Start button and select All Programs. Find and right click the program shortcut you use often and choose Pin to Start menu. You can paste up to 30 programs to the Start menu, depending on your screen resolution settings. With favorite program you can now utilize the most of the Start menu.
Checking the Internet Explorer Add-on
At the time of a variety of Web sites, Windows XP may download the add-on is usually ActiveX controls designed to enhance your use of the site. Add-on can include toolbar, software installer, and multimedia file viewer. However, some add-on could be spyware, which can decrease the performance of Windows XP. So when you have to check add-on in Internet Explorer to make sure they are all valid.
On Internet Explorer, click the Tools menu, Manage Add-ons. Dialog box on the Manage Add-ons, make sure that fi eld is set to Show Add-ons that have been used by Internet Explorer. View a list and note the name of each add-on, publisher, status, type, and file. If there are add-on that you do not know, select and then select the Disable option. Click OK.
Go to your favorite search engine and search add-on name for more information. If it is true that aalah add-on is valid, more open dialogue box and the Add-on re-enable the add-on.
Removing Run Command MRU List
If you often use the Run command to run the application, you surely know that Windows XP stores the registry on the history MRUList (most recently used), which contains all the applications that recently you run. In the Run dialog box appears, you can see the MRU list by clicking the arrow drop-down side by side with the Open text box.
MRU list is intended to mem permudah at the time you run more applications at the same time then. However, the list can be long enough so that it is difficult to find what you want. Fortunately, you can create a shortcut to delete the registry list of the Run MRU.
To do this, run the Registry Editor. Go to HKEY_CURRENT_USER \ Software \ Microsoft \ Windows \ CurrentVersion \ Explorer \ RunMRU. RunMRU key right-click and then select Export. Name the Clear Run MRU, and click the Save button. Close the Registry.
Open file Clear Run MRU.reg in Notepad. Add the minus sign at the beginning of the key. Delete all lines after the key path. Save the file and close Notepad. Reboot Windows (or at least log off and log back on) so that changes applied. Now, every time you want to remove the Run MRU list, click Clear ganda fi le Run MRU.reg. Registry Configuration rmasi akan ask and you notice that the request is successful. Read More..
Subscribe to:
Posts (Atom)
